Friday, 24 March 2017
Saturday, 18 March 2017
Tuesday, 14 March 2017
How to create Page View Controller in Objective-C ?
Page View Controller in Objective-C
Introduction
A page view controller lets the user navigate between pages of content, where each page is managed by its own view controller object. More...
In this tutorial, we are creating an app showing apple devices images using Page View Controller using Objective-C language.
Steps to create Page View Controller Project as follows:
Step 1: Launch Xcode and create new project by clicking on Single View Application template under iOS tab as shown in below image and click Next button.

Step 2: Enter product name as PageViewDemo and select Language as Objective-C then again click on Next button as shown in below image. Later click on Create button to create project on the next pop-up window.

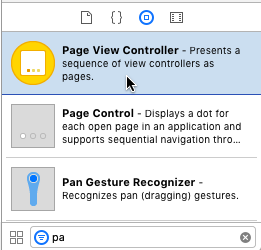
Step 3: On your project, just go to main.storyboard file available in the project navigator, in storyboard canvas, and search Page View Controller from Object Library then drag & drop to the storyboard. Make Page View Controller as Initial View Controller by dragging Arrow from exiting View Controller to Page View Controller.
Thereafter, View Controller will be instantiated through Page View Controller class using its storyboard ID.

View Controller will be content view controller where the contents of the page view controller will be displayed.

Step 4: Creating Class for PageViewController
Now, we need to create a class for Page View Controller and its superclass should be UIPageViewController as can be seen in given image. To create new class, select Xcode File -> New -> File menu option (or press Cmd + N).

select the Cocoa Touch Class and click on Next.

After clicking on Next, enter class name as PageViewController and make sure its subclass is UIPageViewController, then click on Next and create button.

Step 5: Associate class to PageViewController
Now, select Page View Controller from storyboard and associate that class with it by selecting ‘Identity Inspector’ from Inspector Pane and enter the class name i.e. PageViewController in the field of Class as mentioned in below image.

Step 6: Set Image View object to View Controller
Just drag & drop Image View object to View Controller from Object Library and also set its constraints, pin ‘zero’ to four side.

Next is to set Image View property by selecting Assistant Editor option, drag & drop to its class i.e. ViewController.h file and name it as deviceImage.

Step 7: Coding for View Controller
Select ViewController.h file & add following code as mentioned in below image:
@property (strong,nonatomic) NSString *strImage;
@property NSUInteger pageIndex;
Reason to define:
- ‘strImage’ of type String is defined to store that image name by index value to fetch from an array.
- ‘pageIndex’ type of NSUInteger is defined to store index value of page.

Next, select ViewController.m file, there you need to below line in viewDidLoad() method.
self.deviceImage.image = [UIImage imageNamed:self.strImage];
Reason:
- simply passing image name to Image View object to display image.

Step 8: Code for Page View Controller
Now, select PageViewController.h file & firstly import ViewController.h file and one protocol named UIPageViewControllerDataSource just next to subclass of its class then further add the following code:
@property (strong, nonatomic) ViewController *viewController;
Reason to create above property:
- We have created an instance for ViewController named ‘viewController’ class to call its class members in this class.
PageViewController.h file

Now, select PageViewController.m file, here we need to create an array consisting apple device images to display the content in view controller, for that import that images by drag & drop into our project as mentioned in below screenshot and copy all its code in our project.
// array declaration
NSArray *devices;
// Array definition
devices = [NSArray arrayWithObjects:@"iPhone", @"iPad", @"iPod Touch", @"iMac", @"iTV", @"iWatch", @"MacBook_Pro_TouchBar", nil];

PageViewController.m file

Step 9: Coding for mandatory protocol methods
Now, its time to code for protocol methods discussed above.
- viewControllerBeforeViewController
- viewControllerAfterViewController
In viewControllerBeforeViewController() method, this method is responsible for what happens when view controller moves/swipes in backward direction.
- (UIViewController *)pageViewController: (UIPageViewController *)pageViewController viewControllerBeforeViewController: (UIViewController *)viewController{
NSUIntger index = ((ViewController *) viewController).pageIndex;
if (index == 0 || index == NSNotFound) {
return nil;
}
index--;
return [self viewControllerAtIndex: index];
}
In viewControllerAfterViewController() method, this method is responsible for what happens when view controller moves/swipes in forward direction.
- (UIViewController *)pageViewController: (UIPageViewController *)pageViewController viewControllerAfterViewController: (UIViewController *)viewController{
NSUIntger index = ((ViewController *) viewController).pageIndex;
if (index == NSNotFound) {
return nil;
}
index++;
if (index == devices.count) {
return nil;
}
return [self viewControllerAtIndex: index];
}
Most importantly, we need helper method wherein we access ViewController class members and pass index value to Image string variable. We also need to return this method in above protocol methods due to their return type.
// helper method
(ViewController *)viewControllerAtIndex:(NSUInteger)index
{
ViewController *vc = [self.storyboard instantiateViewControllerWithIdentifier:@"ViewController"];
vc.strImage = devices[index];
vc.pageIndex = index;
return vc;
}
NOTE: To instantiate View Controller, we need to set its Storyboard ID named ‘ViewController’.
To set Storyboard ID, select the View Controller and under Identity Inspector enter name ‘ViewController’ in Storyboard ID option as mentioned in below image.

Step 10: Finally Run the Project
Now, we are Ready with our PageView project. Just Run the program & result will be seen below in simulator.

In above result, you will find the images are stretched because Image View property named Content Mode is selected as ‘Scale To Fill’, change it to ‘Aspect Fit’ to display images in its original size which look much better (make sure Image View should be selected).

One more thing, you might notice that while swiping pages, there is Page Curl property selected by default which show the transition like turning pages in books, this property is known as Transition Style. To change this property, select Page View Controller then select ‘Scroll’ style under Attribute Inspector as shown in image.

Again Run the project, here is the result without stretched image.

Hope You Enjoyed!
Have Fun 😇👍🏻
Tuesday, 7 March 2017
How to create Collection View Controller in Objective C ?
Collection View Controller in Objective-C
In previous tutorial we learned about Table View Controller. Now, in this tutorial, we are creating an app of Collection View showing apple devices images. Real-time example : ‘Photos’ App in iPhone/iPad.
Follow below steps to create Collection View project using Objective-C Language:
Step 1: Launch Xcode and create new project by clicking on Single View Application template under iOS tab as shown in below image and click Next button.

Step 2: Enter product name as CollectionViewDemo and select Language as Objective-C then again click on Next button as shown in below image. Later click on Create button to create project on the next pop-up window.

Step 3: On your project, just go to main.storyboard file available in the project navigator, in storyboard canvas, select the View Controller so that it is highlighted in blue colour and hit delete button to remove the controller.


Step 4: Further, search Collection View Controller in Object Library on the right-bottom side. Drag and drop that controller by pressing Ctrl button and place it onto the storyboard.


Also make sure that you have checked “Is Initial View Controller” from Attributes Inspector to give initial entry point to the controller.

Step 5: Creating Class for CollectionViewController
Now, you need to make a class for Collection View Controller. To create new class, select Xcode File -> New -> File… menu option.

select the Cocoa Touch Class and click on Next.

After clicking on Next, enter class name as CollectionViewController and make sure its subclass is UICollectionViewController as said earlier too, click on Next and create button.

Also, associate the class with the your Collection View Controller. By selecting Table View Controller from main.storyboard and select ‘Identity Inspector’ from right hand side as mentioned below.

Now, there is no need of ViewController class files i.e. ViewController.h & ViewController.m showing in project Navigator. Hence you can delete both the files.
Step 6: Coding for Collection View Controller
Select CollectionViewController.h file & add following protocols just after the subclass as mentioned in below image:
- UICollectionViewDataSource
- UICollectionViewDelegate

Next, select CollectionViewController.m file, there you will find below mandatory methods to build Table:
- numberOfSectionsInCollectionView()
- numberOfItemsInSection()
- cellForItemAtIndexPath()
In 1st method, you need to return 1 because we are taking only one section in our case.
In 2nd method, you need to return number of Items in one section which you want to display in each cell.
In 3rd method, you need to return cell and further call array (contains number of images) to display using indexPath.row property.
Step 7: Creating Model to represent
You need to declare an array in .h file & define it in viewDidLoad() method which is defined in .m file.
In our case, we declared array name “deviceImages” using NSArray class containing apple device images in block of interface as mentioned in below screenshot.
NSArray *deviceImages;

Thereafter, download/import images by simply drag & drop to our project into Assets.xcassets folder shown in Project Navigator.

And gave definition in viewDidLoad() method within the block of implementation.
deviceImages = @[@"iPhone",@"iPad",@"iPod",@"iMac",@"iWatch", @"iTV"];
Step 8: Code for protocol method mentioned below:
In numberOfItemsInSection() method, you only need to return “deviceImages.count” which means returning number of items present in our array.
Step 9: Setting Up identifier of cell & its cell.
Most importantly, set name of reuseidentifier of cell named as “Cell” shown in identifier option under Attribute Inspector on left side by selecting cell in Collection View Controller from Storyboard.
Array will be called and assign it to cell.textLabel.text to display in TableView.
Setting Up Identifier name to cell in below image.

Select Collection View to set cell’s width & height from Size Inspector as shown in below image.

Step 10: Setting Up Image View to cell with all its constraints.
To show image in cell, you need to set Image View object into the cell by drag & drop method.
By selecting image view, add Constraints from Pin button, pin from left, right, top & bottom and make sure uncheck “Constrain to Margins” and the click on Add 4 Constraints as shown in image.

Step 11: Associate cell Class to its cell
Next, to set property for Image View, need to create new class for cell named “CollectionViewCell” and its subclass should be UICollectionViewCell. After creating this, associate this class with cell as shown in image.

Step 12: Declaring property for Image Views
Click on “Assistant Editor” shown at top right side to show two views - storyboard & code. Now, by pressing Ctrl button on image view, drag & drop to CollectionViewController.h file as shown in below image. (Make sure Image View is selected while setting up its property).

CollectionViewCell.h file will look like as below:

Now, import CollectionViewCell.h file in CollectionViewController.h file using below code:
#import “CollectionViewCell.h”
Step 13: Code for another protocol method mentioned below:
Also change the datatype of cell variable from UICollectionViewCell to CollectionViewCell defined in cellForItemAtIndexPath() method and then call array to display images in cell using below line in this same method.
cell.deviceImg.image = [UIImage imageNamed: deviceImages[indexPath.row]];
Here is the complete code of CollectionViewController.m file in below mentioned image.

Step 14: Finally, Run the Simulator
You are Ready with your CollectionView. Just Run the program & will be seen below result in simulator.

In above result, there is some clashing the cells with Top-Layout View (same as in previous tutorial of Table View Controller). To remove this you can embed Navigation Controller (same procedure needs to follow ), first select your existing controller i.e. Collection View Controller then follow below steps.
For this just go to Xcode Menu Bar ‘Editor’ -> Embed In -> choose ‘Navigation Controller’. That’s it
Again Run the project, here is the result with the Navigation Controller.

Here, we have successfully build 'Collection View Controller' showing apple device images in cells.
Enjoy! Have Fun 😇👍🏻
Click below link to watch its video.
Video Link: https://www.youtube.com/watch?v=d1Xh7kadAA4&t=25s
Click below link to watch its video.
Video Link: https://www.youtube.com/watch?v=d1Xh7kadAA4&t=25s
Friday, 3 March 2017
How to create Table View Controller in Objective C ?
Introduction of Table View
A table view has only one column and allow vertical scrolling only. It consists of rows in sections. Programmatically, the UIKit framework identifies rows and sections through their index number:
Sections are number 0 through n-1 from the top of a table view of the bottom; Rows are numbered 0 through n-1 within a section.
In this tutorial, you are going to create an Application of Table View listing apple devices names like 'Contacts' App in iPhone / iPad.
Follow below Steps to create Table View Project using Objective-C Language:
Step 1: Launch Xcode and create new project by clicking on Single View Application template under iOS tab as shown in below image and click Next button.

Step 2: Enter product name as TableViewDemo and select Language as Objective-C then again click on Next button as shown in below image. Later click on Create button to create project on the next pop-up window.

Step 3: On your project, just go to main.storyboard file available in the project navigator, in storyboard canvas, select the View Controller so that it is highlighted in blue colour and hit delete button to remove the controller.


Step 4: Further, search Table View Controller in Object Library on the right-bottom side. Drag and drop that controller using Ctrl button and place it onto the storyboard.


Also make sure that you have checked “Is Initial View Controller” from Attributes Inspector to give initial entry point to the controller.

Step 5: Creating Class for TableViewController
Now, you need to make a class for Table View Controller and its superclass should be UITableViewController as can be seen in given image. To create new class, select Xcode File -> New -> File… menu option.

select the Cocoa Touch Class and click on Next.

After clicking on Next, enter class name as TableViewController and make sure its subclass is UITableViewController as said earlier too, click on Next and create button.

Also, associate the class with the your Table View Controller. By selecting Table View Controller from main.storyboard and select ‘Identity Inspector’ from right hand side as mentioned below.

Now, there is no need of ViewController class files i.e. ViewController.h & ViewController.m showing in project Navigator. Hence you can delete both the files.
Step 6: Coding for Table View Controller
Select TableViewController.h file & add following protocols just after the subclass as mentioned in below image:
- UITableViewDataSource
- UITableViewDelegate

Next, select TableViewController.m file, there you will find below mandatory methods to build Table:
- numberOfSectionsInTableView
- numberOfRowsInSection
- cellForRowAtIndexPath
In 1st method, you need to return 1 because we are taking only one section in our case.
In 2nd method, you need to return number of Rows in one section which you want to display in each cell.
In 3rd method, you need to return cell after creating its variable within that method and further call array (contains number of items) to display using indexPath.row property.
Furthermore, you need to declare an array & define it in viewDidLoad() method.

In our case, we declared array name “devices” using NSArray class in block of interface.
NSArray *devices;
And gave definition in viewDidLoad() method within the block of implementation.
devices = @[@"iPhone",@"iPad",@"iPod",@"iMac",@"iWatch", @"iTV"];
Now, its time to code for protocol methods discussed above.
In numberOfRowsInSection() method, you need to return “devices.count” which means returning number of items present in our array.
Most importantly, uncomment cellForRowAtIndexPath() method and in place of reuseidentifier, write @“Cell” . This “Cell” is the name of cell identifier need to set by selecting cell in table view from Storyboard and type cell in identifier option under Attribute Inspector on left side.
Array will be called and assign it to cell.textLabel.text to display in TableView.

Setting Up Identifier name to cell in below image.

You are Ready with your TableView. Just Run the program & will be seen below result in simulator.

In above result, there is some clashing with the 1st cell and signal. To remove this you can embed Navigation Controller but firstly select your existing controller i.e. Table View Controller then follow below steps.
For this just go to Xcode Menu Bar ‘Editor’ -> Embed In -> choose ‘Navigation Controller’. That’s it
Again Run the project, here is the result with the Navigation Controller.

In case of any doubt or confusion, comment below.
Subscribe to:
Posts (Atom)