Monday, 29 May 2017
Friday, 26 May 2017
How to create Picker View in iOS using Objective-C ?
Picker View in iOS (Objective-C)
In this tutorial, we will see how to implement Picker View in iOS application using Objective-C Language.
Picker View is used to show one or more set of values using spinning-wheel or slot-machine metaphor. Users can select values by rotating the wheels so that the desired row of values aligns with a selection indicator. The main use of this object is to select a value from multiple values as drop-down box in the web.
Step 1: Open Xcode and create new project by clicking on Single View Application template under iOS tab as shown in below image and click Next button.

Step 2: Enter the product name as Picker View Example, select the Language as Objective-C and again click Next button as shown in below image. Later click Create button to create project appear on the next window.

Step 3: Adding UIPickerView & UILabel onto the View Controller
On your project, click on main.storyboard file available in the project navigator, and then select the UIPickerView from object library, drag into the superview of View Controller, it will look like below.


Step 4: Setting Up Constraints for Picker View & Label
To set the object in the centre of the view, by selecting the align button listed at the bottom of the storyboard view.

Click the check box of Horizontal center in container and Vertical center in container then select the “Add 2 Constraints” button as shown in above screenshot.
Also add constraints for its height and width, click ‘PIN’ button to add those constraints as shown below. Now, it will work fine with all the iPhone and iPad.

Step 5: Declaring property for Picker View & Label.
Select the Assistant Editor and create IBOutlet property for UIPickerView object by holding Ctrl button and select the UIPickerView object then drag into the ViewController.h file. It will open a popup view like below then enter the Name as ‘pickerView’ and click Connect.

In the same manner, set up the IBOutlet property for Label object & name it as ‘lblText’ and then hit ‘Enter’ button.
Step 6: Adding UIPickerView Datasource and Delegate Protocols
UIPickerView needs delegates and datasource which can be added in ViewController.h file as mentioned below.
We also have to set the value as self for UIPickerView delegate and datasource under viewDidLoad() method in ViewController.m file.
ViewController.h file:
@interface ViewController : UIViewController <UIPickerViewDataSource, UIPickerViewDelegate>

ViewController.m file:

Step 7: Creating Array & setting up protocol methods
In ViewController.h file, declaration of array is done.
@ interface ViewController : UIViewController <UIPickerViewDataSource, UIPickerViewDelegate>
{
NSArray *devices;
}
While in ViewController.m file, definition of array will be defined in viewDidLoad() method.
devices = @[@“iPhone”, @“iPad", @“iPod", @“iMac”, @“iWatch”, @“iTV”];
Now, we have to implement the appropriate UIPickerView datasource & delegate methods.
// datasource methods
- (NSInteger)numberOfComponentsInPickerView:(UIPickerView *)pickerView{
return 1;
}
- (NSInteger)pickerView:(UIPickerView *)pickerView numberOfRowsInComponent:(NSInteger)component{
return devices.count;
}
// delegate methods
- (NSString *)pickerView:(UIPickerView *)pickerView titleForRow:(NSInteger)row forComponent:(NSInteger)component{
return devices[row];
}
- (void)pickerView:(UIPickerView *)pickerView didSelectRow:(NSInteger)row inComponent:(NSInteger)component{
self.lblText.text = data[row];
}
The numberOfComponentsInPickerView() method is used to represent number of columns in the picker element. In our case, we return 1 because we need only one component here.
The numberOfRowsInComponent() method is used to represent number of rows of data in that particular component. Here we return devices.count which is 6 items in our case.
The titleForRow:forComponent: method is used to represent the data in specified rows in component. Simply return array[row] to display all items of array in picker view.
The didSelectRow:inComponent: method is called while selecting any row of Picker view, here in our case, we have selected ‘iPad’ item which is further showing in Label.
Here is the complete code of your project:

Step 8: Finally, Build and Run the application where you will get the output like below.

Hope You Enjoyed !
You can also visit below link for this blog Video.
Saturday, 13 May 2017
Friday, 12 May 2017
How to create Local Notification in iOS using Objective-C ?
Local Notification in Objective-C
Introduction
There are two types of notifications: Local and remote notifications. Remote notification require connection to a server which pushes the notification to your device. These are beyond the scope of this tutorial. Local notifications are notifications for events that happen on your device. We’ll set up these types of notifications in this lesson.
In this tutorial, we are going to create an app which receives local notification like - In Reminders app, we get notify for any task the user added.


Steps to create Local Notification project using Objective-C Language:
Step 1: Launch Xcode and create new project by clicking on Single View Application template under iOS tab as shown in below image and click Next button.
Step 2: Enter product name as LocalNotificationDemo and select Language as Objective-C then again click on Next button as shown in below image. Later click on Create button to create project on the next pop-up window.

Step 3: In your project, first you need to import ‘UserNotifications’ framework to enable local notification by clicking project settings in General Tab under ‘Linked Frameworks and Libraries’ choose ‘+’ button as shown in below screenshot.

After clicking on ‘+’ button, list of framework will be shown where you need to search the said framework.

Thereafter, type below mentioned line of code in ViewController.h file.
#import <UserNotifications/UserNotifications.h>

Step 4: Now, just go to main.storyboard file available in the project navigator as shown in left image, further search button from Object Library on the right hand side as shown in right image then drag it onto View Controller.


Step 5: Further, click on ‘Assistant Editor’ to declare property for button in ViewController.h file by drag & drop method and name it as showNotification, make sure its connection type is Action.

Step 6(a): Coding in ViewController.m file
Select ViewController.m file & add following code in viewDidLoad method as mentioned in below image:

bool isGrantedNotificationAccess;
The variable is declared outside viewDidLoad() method to make it global, and on the basis of its value notification task will be performed after clicking on button which we have taken. Initially, variable is initialised with false value in viewDidLoad() method.
Authorization
You need to have the user’s permission for granting to receive notifications. Make your request early in your app life cycle such as in viewDidLoad() method. The first time your app requests for authorisation, the system will show an alert for allowing or disallowing the permissions. (as seen in image)

For the same, we need to create instance of UNUserNotificationCenter class using currentNotificationCenter method to manage notifications.
UNUserNotificationCenter *center = [UNUserNotificationCenter currentNotificationCenter];
Now, there are three notification types: alert, sound and badge. We can combine all as required. For example, in our case, only alert and sound is taken.
UNAuthorizationOptions options = UNAuthorizationOptionAlert +UNAuthorizationOptionSound;
Thereafter, we need to create actual authorisation request using instance of notification centre.
[center requestAuthorizationWithOptions:options completionHandler:^(BOOL granted, NSError * _Nullable error) {
isGrantedNotificationAccess = granted;
}];
In above line of code, framework calls the completion handler with a boolean indicating if the access was granted and an error object which will be nil if no error occurred.
Step 6(b): Coding in button method
In this method, we need to create notification request using UNNotificationRequest wherein content and trigger condition is required.

Creating Notification Content
The content of a notification is an instance of UNMutableNotificationContent with the following properties as required:
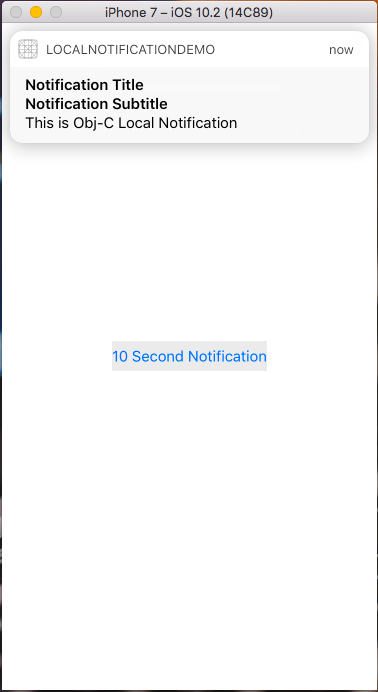
title: a string containing the primary reason for the alert.
subtitle: string containing an alert subtitle (if required).
body: string containing the alert message text.
sound: a sound to play when alert is delivered.
badge: number to show on the app’s icon in red colour.
UNMutableNotificationContent *content = [[UNMutableNotificationContent alloc] init];
content.title = @"Notification Title";
content.subtitle = @"Notification Subtitle";
content.body = @"This is Obj-C Local Notification";
content.sound = [UNNotificationSound defaultSound];
Creating Notification Trigger
Trigger a notification based on time and can be repeating which can be created using class UNTimeIntervalNotificationTrigger.
UNTimeIntervalNotificationTrigger *trigger = [UNTimeIntervalNotificationTrigger triggerWithTimeInterval:10 repeats:NO];
Setting Up Notification Request
With both the content and trigger ready we create a new notification request and add it to the notification center. Each notification request requires a string identifier for future reference:
UNNotificationRequest *request = [UNNotificationRequest requestWithIdentifier:@"UYLLocalNotification" content:content trigger:trigger];
// add notification for current notification centre
[center addNotificationRequest:request withCompletionHandler:nil];
Note: Calling addNotificationRequest with the same identifier string will replace the existing notification. If you want to schedule multiple requests use a different identifier each time.
Now, You can run your project but notification will receive only in background. When the application appears, Press the button and then press Command-Shift-H to go to the home screen i.e. background and wait for ten seconds.
The Notification Delegate
If you want to receive notifications while your app is in the foreground you need to implement the UNUserNotificationCenterDelegate protocol. This protocol defines optional method:
userNotificationCenter(_:willPresent:withCompletionHandler:) is called when a notification is delivered to a foreground app. You receive the UNNotification object which contains the original UNNotificationRequest . You call the completion handler with the UNNotificationPresentationOptions you want to present (use .none to ignore the alert).
It is important to set the delegate before your app finishes launching. For example, in the app delegate method didFinishLaunchingWithOptions:

- (void)userNotificationCenter:(UNUserNotificationCenter *)center willPresentNotification:(UNNotification *)notification withCompletionHandler:(void (^) (UNNotificationPresentationOptions))completionHandler
{
UNNotificationPresentationOptions presentationOptions = UNNotificationPresentationOptionSound +UNNotificationPresentationOptionAlert;
completionHandler(presentationOptions);
}
- (BOOL)application:(UIApplication *)application didFinishLaunchingWithOptions:(NSDictionary *)launchOptions {
// Override point for customization after application launch.
UNUserNotificationCenter *center = [UNUserNotificationCenter currentNotificationCenter];
center.delegate = self;
return YES;
}
Now, your local notification application is ready, you can run your app to see the result.
Enjoy! Have Fun 😇 👍🏻
Tuesday, 2 May 2017
How to create Video Player in iOS using Objective-C ?
VIDEO PLAYER in Objective-C
Video can be played in iOS app using class AVPlayerController that provides playback of video data from a file or memory.
Follow the below steps to build an Video playing App:
Step 1: Create a Single View Application
Next, enter product name as VideoPlayerDemo and select language as Objective-C.

Step 2: Firstly, add any video file into the project by simply drag and drop method (make sure below selected option in 2nd image should be checked for keeping copy of that file into our project).


Step 3: Now, just go to main.storyboard and set a button named Play Video on controller.

Step 4: Go to ViewController.h file and import AVFoundation & AVKit Framework. Also set property of Action connection for the Play Video button.
Code will look like:-

Step 5: In ViewController.m file, type the below code in the curly braces of button method.
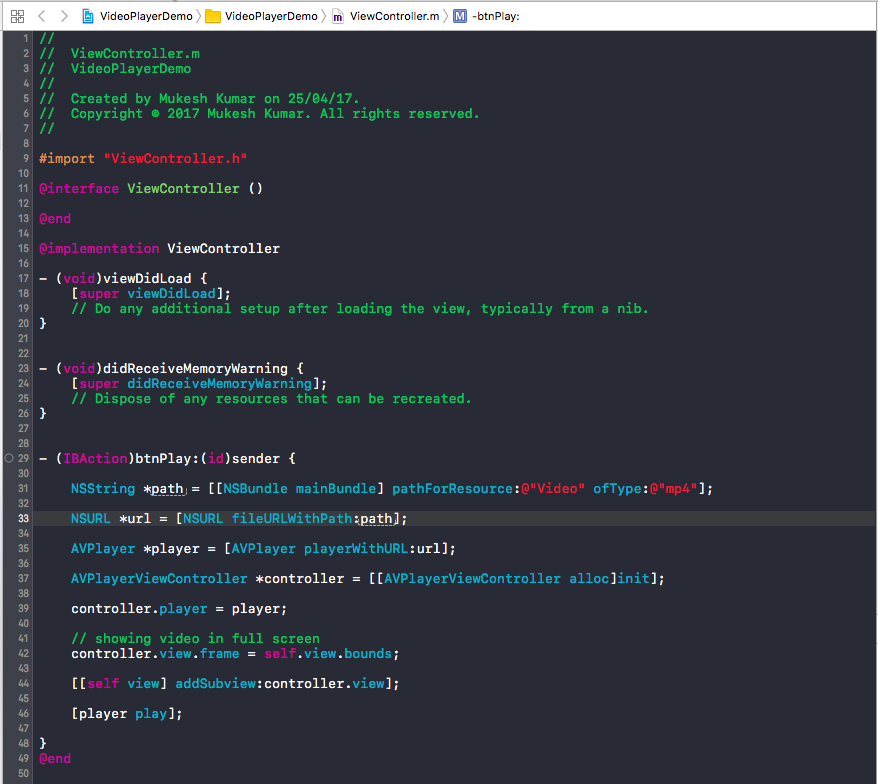
Here is the explanation of above code as under:
In below line of code, we are storing path of video file in variable of type string named path. One can access file’s path using NSBundle class and then its class method name mainBundle, then instance method named pathForResource where you need to specify only filename (Case Sensitive) and ofType where you need to specify its extension (without dot sign).
NSString *path = [NSBundle mainBundle] pathForResource: @“Video” ofType: @“mp4”];
Thereafter, path of video file will be passed to url variable of type URL using the class method fileURLWithPath as mentioned below:
NSURL *url = [NSURL fileURLWithPath: path];
Now, creating an instance of AVPlayer where url is passed using class method playerWithURL as shown below.
AVPlayer *player = [AVPlayer playerWithURL: url];
Furthermore, we need to create instance of AVPlayerController which is used to play video and give allocation with initialisation.
AVPlayerController *controller = [[AVPlayerController alloc] init];
We need to pass player instance to the player of controller to play a video by using below code.
controller.player = player;
To run the video on full screen, we need to assign present view’ bounds to controller’s view frame as shown below.
controller.view.frame = self.view.bounds;
This already created controller’s view (subview) is not added to the view of present controller so for that below code is used to add the same.
[ [self view] addSubView: controller.view];
Simply play the player now.
[player play];
Step 6: Run the App, you will see video like below.

Enjoy Music with Video 😇
Visit below link for the video of the same:
Subscribe to:
Posts (Atom)