Local Notification in Objective-C
Introduction
There are two types of notifications: Local and remote notifications. Remote notification require connection to a server which pushes the notification to your device. These are beyond the scope of this tutorial. Local notifications are notifications for events that happen on your device. We’ll set up these types of notifications in this lesson.
In this tutorial, we are going to create an app which receives local notification like - In Reminders app, we get notify for any task the user added.


Steps to create Local Notification project using Objective-C Language:
Step 1: Launch Xcode and create new project by clicking on Single View Application template under iOS tab as shown in below image and click Next button.

Step 2: Enter product name as LocalNotificationDemo and select Language as Objective-C then again click on Next button as shown in below image. Later click on Create button to create project on the next pop-up window.

Step 3: In your project, first you need to import ‘UserNotifications’ framework to enable local notification by clicking project settings in General Tab under ‘Linked Frameworks and Libraries’ choose ‘+’ button as shown in below screenshot.

After clicking on ‘+’ button, list of framework will be shown where you need to search the said framework.

Thereafter, type below mentioned line of code in ViewController.h file.
#import <UserNotifications/UserNotifications.h>

Step 4: Now, just go to main.storyboard file available in the project navigator as shown in left image, further search button from Object Library on the right hand side as shown in right image then drag it onto View Controller.


Step 5: Further, click on ‘Assistant Editor’ to declare property for button in ViewController.h file by drag & drop method and name it as showNotification, make sure its connection type is Action.

Step 6(a): Coding in ViewController.m file
Select ViewController.m file & add following code in viewDidLoad method as mentioned in below image:

bool isGrantedNotificationAccess;
The variable is declared outside viewDidLoad() method to make it global, and on the basis of its value notification task will be performed after clicking on button which we have taken. Initially, variable is initialised with false value in viewDidLoad() method.
Authorization
You need to have the user’s permission for granting to receive notifications. Make your request early in your app life cycle such as in viewDidLoad() method. The first time your app requests for authorisation, the system will show an alert for allowing or disallowing the permissions. (as seen in image)

For the same, we need to create instance of UNUserNotificationCenter class using currentNotificationCenter method to manage notifications.
UNUserNotificationCenter *center = [UNUserNotificationCenter currentNotificationCenter];
Now, there are three notification types: alert, sound and badge. We can combine all as required. For example, in our case, only alert and sound is taken.
UNAuthorizationOptions options = UNAuthorizationOptionAlert +UNAuthorizationOptionSound;
Thereafter, we need to create actual authorisation request using instance of notification centre.
[center requestAuthorizationWithOptions:options completionHandler:^(BOOL granted, NSError * _Nullable error) {
isGrantedNotificationAccess = granted;
}];
In above line of code, framework calls the completion handler with a boolean indicating if the access was granted and an error object which will be nil if no error occurred.
Step 6(b): Coding in button method
In this method, we need to create notification request using UNNotificationRequest wherein content and trigger condition is required.

Creating Notification Content
The content of a notification is an instance of UNMutableNotificationContent with the following properties as required:
title: a string containing the primary reason for the alert.
subtitle: string containing an alert subtitle (if required).
body: string containing the alert message text.
sound: a sound to play when alert is delivered.
badge: number to show on the app’s icon in red colour.
UNMutableNotificationContent *content = [[UNMutableNotificationContent alloc] init];
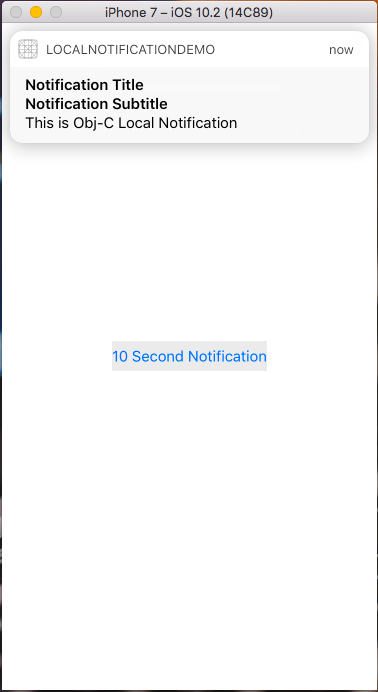
content.title = @"Notification Title";
content.subtitle = @"Notification Subtitle";
content.body = @"This is Obj-C Local Notification";
content.sound = [UNNotificationSound defaultSound];
Creating Notification Trigger
Trigger a notification based on time and can be repeating which can be created using class UNTimeIntervalNotificationTrigger.
UNTimeIntervalNotificationTrigger *trigger = [UNTimeIntervalNotificationTrigger triggerWithTimeInterval:10 repeats:NO];
Setting Up Notification Request
With both the content and trigger ready we create a new notification request and add it to the notification center. Each notification request requires a string identifier for future reference:
UNNotificationRequest *request = [UNNotificationRequest requestWithIdentifier:@"UYLLocalNotification" content:content trigger:trigger];
// add notification for current notification centre
[center addNotificationRequest:request withCompletionHandler:nil];
Note: Calling addNotificationRequest with the same identifier string will replace the existing notification. If you want to schedule multiple requests use a different identifier each time.
Now, You can run your project but notification will receive only in background. When the application appears, Press the button and then press Command-Shift-H to go to the home screen i.e. background and wait for ten seconds.
The Notification Delegate
If you want to receive notifications while your app is in the foreground you need to implement the UNUserNotificationCenterDelegate protocol. This protocol defines optional method:
userNotificationCenter(_:willPresent:withCompletionHandler:) is called when a notification is delivered to a foreground app. You receive the UNNotification object which contains the original UNNotificationRequest . You call the completion handler with the UNNotificationPresentationOptions you want to present (use .none to ignore the alert).
It is important to set the delegate before your app finishes launching. For example, in the app delegate method didFinishLaunchingWithOptions:

- (void)userNotificationCenter:(UNUserNotificationCenter *)center willPresentNotification:(UNNotification *)notification withCompletionHandler:(void (^) (UNNotificationPresentationOptions))completionHandler
{
UNNotificationPresentationOptions presentationOptions = UNNotificationPresentationOptionSound +UNNotificationPresentationOptionAlert;
completionHandler(presentationOptions);
}
- (BOOL)application:(UIApplication *)application didFinishLaunchingWithOptions:(NSDictionary *)launchOptions {
// Override point for customization after application launch.
UNUserNotificationCenter *center = [UNUserNotificationCenter currentNotificationCenter];
center.delegate = self;
return YES;
}
Now, your local notification application is ready, you can run your app to see the result.
Enjoy! Have Fun 😇 👍🏻
Super Bro...
ReplyDeleteThanks for your compliment...
DeleteThank you for your compliment that my blogs helped you.
ReplyDeleteit's really superb …. thank you
ReplyDelete