Tuesday, 4 July 2017

Tuesday, 27 June 2017
How to implement Slider in iOS using Objective-C with Xcode 8 ? (Blog)
Slider control in iOS (Objective-C)
In this tutorial blog, we will see how to implement Slider control for iOS application using Objective-C Language.
Slider is a control used to select a single value from a continuous range of values. To do so, UISlider class is provided to implement slider control into your iOS project.

Example - In real scenario, it can be seen to increase/decrease brightness of your iPhone/iPad.
Following are the steps to implement Slider control:
Step 1: Open Xcode -> click on Create new Xcode project then choose Single View Application template under iOS tab as shown in below image and click Next button.

Step 2: Enter the product name as SliderDemo, select the Language as Objective-C and again click Next button as shown in below image. Later click Create button to create project appear on the next window.

Step 3: Adding UISlider & UILabel into the View Controller.
On your project, click on main.storyboard file available in the project navigator, and then select the UISlider from object library, drag into the superview of View Controller, it will look like below.


Slider control is having following properties:
Value
It is the value which is getting printed as its initial value. Its default value of 0.5.
Minimum Value
It is the value from where it gets started. Its default min. value is 0.
Maximum Value
It is the value where it gets end. Its default max. value is 1.
In the same manner, Label object will also be placed using drag & drop method into View Controller to show the value of Stepper control.
Step 4: Declaring property for Slider & Label.
Select the Assistant Editor and create IBOutlet & IBAction property for UIStepper control by holding Ctrl button. It will open up a popup view like below then enter the Name as ‘stepper’ and ‘stepperClicked’ respectively and click Connect.


Both property (IBOutlet & IBAction) is defined because number will be displayed on Label on action event of Stepper control by calling its outlet property to access it value (as seen in below screenshot).
In the same manner, set up the IBOutlet property for Label object & name it as ‘lblStatus’ and then hit ‘Enter’ button.

The all property defined in ViewController.h file will be shown as below:
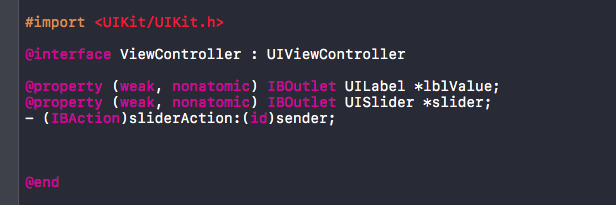
Step 5: Complete Code in ViewController.m file
In ViewController.m file, displaying value of stepper will be passed to Label in stepper action method as shown in below screenshot.

Step 6: Finally, Build and Run the application where you will get the output like below.

Have Fun !
You can also watch its video on below link:
Monday, 26 June 2017
Thursday, 22 June 2017
Sunday, 18 June 2017
How to implement Stepper control in iOS using Objective-C with Xcode-8 ? (Blog)
Stepper control in iOS (Objective-C)
In this tutorial blog, we will see how to implement Stepper control for iOS application using Objective-C Language.
Stepper is a control which offers the user to increment/decrement a value. It is a two-segment control which consists of + & - symbol used to increase and decrease a value respectively. To do so, UIStepper class is provided to implement stepper control into your iOS project. This control is basically used to mention a numeric value of an object.
Example - In real scenario, it can be seen when you give print from your iPhone/iPad and need to specify how many pages you want to print, then there is stepper used to specify your number of pages to print.
Following are the steps to implement Stepper control:
Step 1: Open Xcode -> click on Create new Xcode project then choose Single View Application template under iOS tab as shown in below image and click Next button.
Step 2: Enter the product name as StepperDemo, select the Language as Objective-C and again click Next button as shown in below image. Later click Create button to create project appear on the next window.

Step 3: Adding UIStepper & UILabel into the View Controller.
On your project, click on main.storyboard file available in the project navigator, and then select the UIStepper from object library, drag into the superview of View Controller, it will look like below.


Stepper control is having following properties:
Value
It is the value which is getting printed as its initial value. Its default value of 0.
Minimum Value
It is the value from where it gets started. Its default min. value is 0.
Maximum Value
It is the value where it gets end. Its default max. value is 100.
Step Value
It is the value which will increment/decrement each time when +/- pressed. Its default value is 1.
Autorepeat
The value will continuously increment/decrement when +/- pressed & hold. Its default value is YES/TRUE.
Continuous
The value change events are send immediately when +/- pressed. Its default value is also YES/TRUE.
Wrap
It is the value which will continuously increment/decrement after reaching its end value or start value. Its default value is NO/FALSE.
The default values of Stepper control can be changed manually from Attribute Inspector as well as using code as mentioned below.
self.stepper.value = 2;
self.stepper.minimumValue = 1;
self.stepper.maximumValue = 100;
self.stepper.stepValue = 10;
self.stepper.autorepeat = YES;
self.stepper.continuous = YES;
self.stepper.wraps = NO;
In the same manner, Label will also be placed using drag & drop method into View Controller to show the value of Stepper control.
Step 4: Declaring property for Stepper & Label.
Select the Assistant Editor and create IBOutlet & IBAction property for UIStepper control by holding Ctrl button. It will open up a popup view like below then enter the Name as ‘stepper’ and ‘stepperClicked’ respectively and click Connect.


Both property (IBOutlet & IBAction) is defined because number will be displayed on Label on action event of Stepper control by calling its outlet property to access it value (as seen in below screenshot).
In the same manner, set up the IBOutlet property for Label object & name it as ‘lblStatus’ and then hit ‘Enter’ button.

The all property defined in ViewController.h file will be shown as below:

Step 5: Complete Code in ViewController.m file
In ViewController.m file, displaying value of stepper will be passed to Label in stepper action method as shown in below screenshot.

Step 6: Finally, Build and Run the application where you will get the output like below.

Have Fun !
Wednesday, 14 June 2017
How to implement Switch control in Objective-C with Xcode 8 ? (Blog)
Switch control in iOS (Objective-C)
In this tutorial, we will see how to implement Switch control in iOS application using Objective-C Language.
Switch is a control which offers to choose ON/OFF state. To do so, UISwitch class is used to implement switch control into your iOS project. This control is basically used to turn On or Off functionality of a particular task.
Example - Turning ON/OFF WiFi or Airplane Mode or Mobile Data in Settings of your iPhone or iPad.
Following are the steps to implement Switch control:
Step 1: Open Xcode and create new project by clicking on Single View Application template under iOS tab as shown in below image and click Next button.

Step 2: Enter the product name as SwitchDemo, select the Language as Objective-C and again click Next button as shown in below image. Later click Create button to create project appear on the next window.

Step 3: Adding UISwitch & UILabel into the View Controller.
On your project, click on main.storyboard file available in the project navigator, and then select the UISwitch from object library, drag into the superview of View Controller, it will look like below.


Moreover, Switch control is by default at ON state. Manually, you can set to OFF from Attribute Inspector by selecting Switch control.
In the same manner, Label will also be placed using drag & drop method into View Controller to show the states of Switch control.
Step 4: Declaring property for Progress View & Label.
Select the Assistant Editor and create IBOutlet & IBAction property for UISwitch control by holding Ctrl button. It will open up a popup view like below then enter the Name as ‘switchButton’ and ‘switchSwipped’ respectively and click Connect.


Both property (IBOutlet & IBAction) is defined because on action event of Switch control some text should be displayed on condition of its state which will be known using isOn method of switch by calling its outlet property as the same can be seen in below screenshot.
In the same manner, set up the IBOutlet property for Label object & name it as ‘lblStatus’ and then hit ‘Enter’ button.
The all property defined in ViewController.h file will be shown as below:

Step 5: Complete Code in ViewController.m file
In ViewController.m file, all code will be written in action method of switch control where we check the state of switch control by accessing its name of outlet property using isOn property in if statement. Thereafter, some message will be displayed like “Switch is ON” will be displayed on Label and if that not On then “Switch is OFF” will be displayed on Label.

That’s the complete code for Switch control program.
Step 6: Finally, Build and Run the application where you will get the output like below.

Have Fun !
You can also watch its video on below link:
Subscribe to:
Posts (Atom)