STACK VIEW IN IOS
In this tutorial, we are going to discuss about Stack View, a part of Auto Layout. Let’s get started to discuss & implement Stack View into our application in Xcode 8.
When you need to set position for multiple views, auto layout is used where constraints are applied for multiple views but while modifying or updating that constraints become much complex. To reduce that complexity, Stack View is introduced to handle it out.
Stack View is a powerful tool and a part of auto layout which acts as a container for other views. UIStackView is a subclass of UIView. This Stack View provides grouping of elements in an organised manner. Elements can be organised using some of the following properties:
- Axis: describes for laying out view Horizontally or Vertically.
- Alignment: to align views perpendicular to axis of stack view.
- Distribution: defines the views to be sized.
- Spacing: defines the distance b/w the subviews of stack view.
Now, let’s get started to create new Xcode project for embedding Stack View and see how it works practically.
I have already made a sample Xcode project wherein I have taken multiple TextFields & Buttons and applied constraints on it without using Stack View.
Download the above sample project and save it in your Mac or Laptop. Thereafter, open it and proceed with the following steps.
Following are the steps to embed Stack View into Xcode project:
Step 1: Open Existing Xcode project (Sample Stack View project) from where you saved your downloaded sample project.
Now, here you will find some of the elements already taken and constraints are also applied without using stack view.
Step 2: Remove all constraints except Navigation Bar and Image View. Select all textfields and buttons then go to auto layout bar & click on Clear Constraints as shown in below screenshot.
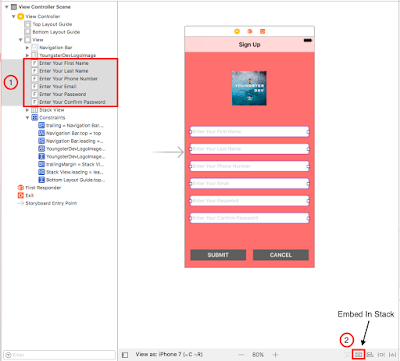
Step 3: Embed Stack View in all TextFields & Buttons.
On your project, select all textfields first and click on Embed In Stack button from Auto Layout Bar available at bottom right side. You will see all textfields will come up in compressed manner.
Adding Constraints to stack view
Now, add constraints only to the stack view by following ways:
- Pin it to left and right, value 0.
2. Give its x-position to Centre Horizontally.
3. Set vertical spacing from stack view to Image View.
Thereafter, from stack view properties, set its Distribution property to ‘Fill Equally’ and Spacing to ‘20’ to make distance b/w textfields.
In the same manner, embed in stack for buttons and apply constraints to the stack view of buttons by pinning from left & right to value ‘0’ and bottom to value ‘20’. Also set vertical spacing from upper stack view by dragging method.
Step 4: Run Simulator
Hence you can now check your views using stack view in Simulator.
Hope you enjoy this video !
Have Fun !
You can also watch its video on below link:
Link to download sample project:


No comments:
Post a Comment